
The Passpoint scanner shows which Hotspot 2.0 (Passpoint) networks are on the air at a venue and what their access points say about themselves over ANQP: which identity providers and roaming groups they accept, which mobile carriers they serve, and how the venue describes itself. On iPhone, the Sysdiagnose Parser reads the phone's own Wi-Fi logs, so you can see what the phone did with those networks.
What you need
- Passpoint scanner: iPhone, iPad or Android.
- On iPhone and iPad it needs a connected sensor: a Linux sensor (NanoPi, Raspberry Pi, WLAN Pi) or an ESP32-C5 board with ANQP firmware.
- On Android it can also use the phone's own Wi-Fi (Phone Wi-Fi). Without a supported framework patch or root tools, that source gives fewer ANQP details than a sensor does.
- Sysdiagnose Parser: iPhone and iPad only. No sensor needed.
How to check a venue's Passpoint and OpenRoaming support
- Connect your sensor on Devices.
- Open the scanner.
- On iPhone, expand the tab bar and tap Passpoint. On iPad, Passpoint Scanner in the sidebar.
- On Android, expand the bottom bar and tap Passpoint.
- Choose the sensor.
- On iPhone and iPad, the scanner uses the device selected on Devices. If none is selected, you see No Device Selected.
- On Android, tap Source: and choose the sensor or Phone Wi-Fi.
- Choose the radio.
- On iPhone and iPad, tap the Interface menu and pick one. An ESP32-C5 board needs no interface.
- On Android with a Linux sensor, tap the radio line under the source and pick one.
- Optional: turn on Include Interworking-only APs to also list access points that advertise 802.11u interworking but not Passpoint. On Android this is in the filter menu at the top.
- Start the scan.
- On iPhone and iPad, tap Start (Linux sensor) or Start Scan (ESP32-C5).
- On Android, tap Start Scan, or the refresh button at the top after a previous scan.
- While it runs, the status line shows progress. Tap Stop to end it early.
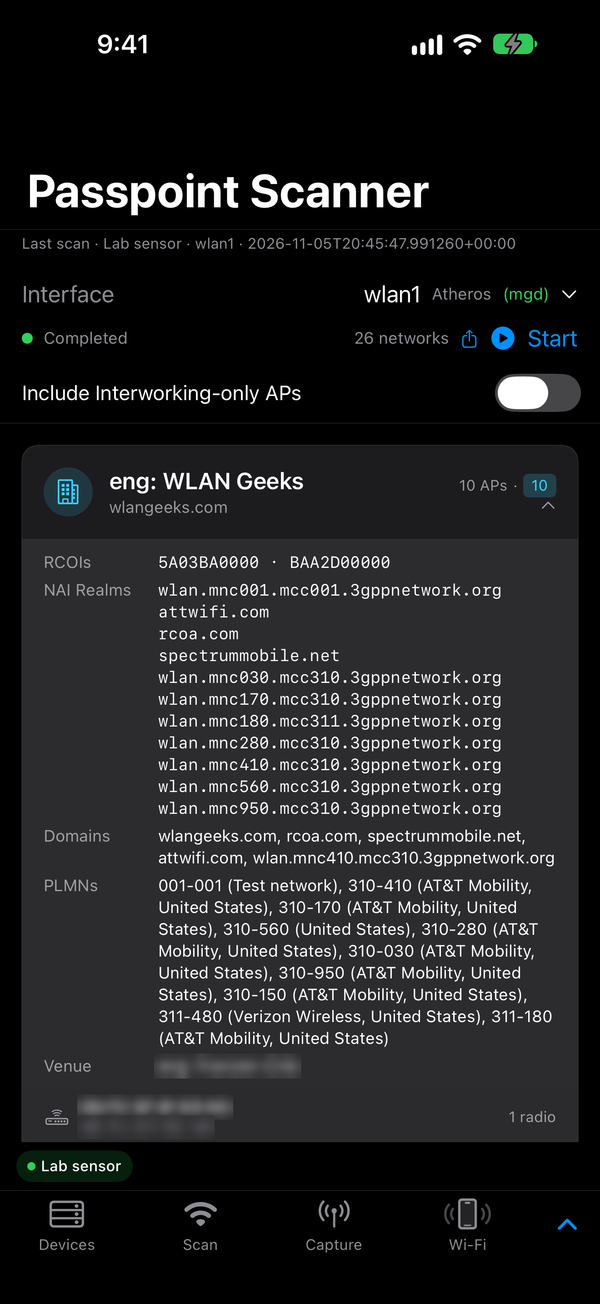
- Read the results. Networks are grouped by provider. The group name is the operator name if an access point gave one, or else its first domain, RCOI or NAI realm. A group no access point has answered for yet shows as Unknown Provider.
- Tap a network to open Passpoint Details. The useful sections:
- NAI Realms: the identity realms the network will authenticate (for example, a carrier's or a university's realm).
- Roaming Consortiums (ANQP) and Roaming Consortiums (Beacon): the RCOIs. OpenRoaming networks advertise the OpenRoaming RCOIs here.
- 3GPP Cellular Networks: the MCC and MNC of each carrier whose subscribers can use SIM-based sign-in. Android labels this PLMNs.
- Domain Names and Operator Information: who runs the hotspot, and the venue name and venue URL.
- To keep the results, tap the share button. Android adds the scan diagnostics to the shared text.
If nothing is found, the scanner says No Passpoint Networks Found and how many SSIDs it checked.
How to read an iPhone sysdiagnose
iPhone and iPad only.
- Make a sysdiagnose on the iPhone you want to look at. The app's hint: Settings › Privacy &
Security › Analytics, or press Side + Volume for about half a second. Save the
.tar.gzarchive to Files. - Open the parser. On iPhone, More › Sysdiagnose Parser. On iPad, Sysdiagnose Parser in the sidebar.
- Tap Import Sysdiagnose and choose the
.tar.gzarchive. You see Importing Sysdiagnose. Large archives can take a minute. Tap Cancel to stop. - The Wi-Fi Diagnostics report opens. Use the tabs along the top:
- Timeline: every event in order.
- Overview: the device and capture summary.
- Roaming: roams, with the access points around the phone at the time.
- Joins: joins and leaves, with reasons.
- Passpoint: GAS/ANQP queries and profile matching.
- Saved Wi-Fi: the phone's known networks, including private MAC assignments.
- Wi-Fi Call, Path/Assist and Faults: Wi-Fi calling, network path decisions, and authentication and association failures.
- Tap Done to close. The import stays under Recent Imports. Tap it to reopen it, or swipe to delete it.
To look at a Known Networks plist you have already extracted, use Known Networks and Private MAC › Import a Known Networks Plist.
Tips
- An advertisement, an ANQP reply and a working sign-in are three different things. A beacon says the network supports Passpoint. An ANQP reply says which providers it lists. Neither proves that a particular subscription can authenticate. Only a real connection proves that.
- A missing reply is not a "no". A timeout can come from AP policy, radio timing or the link to the sensor. To diagnose, scan again close to one access point. The app reports a failed scan as Passpoint scan did not complete. That does not mean the venue has no Passpoint.
- Venue text comes from the AP. A venue name or URL is what the operator typed in. It is not proof of a physical address.
- The ESP32-C5 transmits when it queries. Listening for beacons is passive, but an ANQP query is a normal station transmission. The board boots idle and stops when the app disconnects.
- A sysdiagnose shows the phone's side, not the air. It is a different source from a radio capture. Logs can be incomplete, cover only a limited time, or be redacted by iOS.
- Treat a sysdiagnose as private. It contains system and app records. Analyse it in the app. Don't attach a whole archive to a public issue or support email.
- Results identify networks. Check screenshots and exports before you share them (privacy policy).
- RADIUS testing is a sensor feature. The 2.1.36 sensor console manages CfreeRADIUS and FreeRADIUS: NAS clients, PAP users and engine selection. Neither engine starts by default, and full authentication workflows are not yet fully qualified. See Use RADIUS in the Sensor console.
If it doesn't work
| What you see | What to do |
|---|---|
| No Device Selected (iPhone) | Connect a sensor on Devices and select it. |
| No interfaces or nothing to choose in Interface | Open Refresh in the Interface menu. Check that the sensor's radio is up. |
| Start Scan on an ESP32-C5 says the board is not ready | Reconnect the board from Devices. Check that Bluetooth is on and allowed. |
| "Use a compatible ESP32-C5 BLE sensor with ANQP firmware." (Android) | The board's firmware does not support ANQP queries. Update it from the ESP32-C5 page. |
| "Richer ANQP details require a supported framework patch…" (Android) | You are using Phone Wi-Fi. Choose a sensor as the Source: for full ANQP data. |
| Scan Failed or Scan incomplete · Review issue | Tap Review issue for the reason. Move closer to the APs and scan again. |
| Networks listed but ANQP data not yet queried | The AP did not answer in time. Scan again closer to it. |
Related
Scan & discover · ESP32-C5 · Connecting sensors · Survey & map · Sensor console · Support