Where: mobile app with a supported sensor. The device website exposes the image's Scanner tool; it is a separate interface from the app's live AP and client lists.
Scan answers "what is on the air here": which access points and SSIDs are nearby, on which channels, with which security and capabilities, and which clients are talking to them.
What you need
- A connected monitor-capable sensor: a supported Linux capture sensor, an ESP32-C5 board, or another integration with scan capability. See hardware compatibility.
- iPhone or Android. On Android you can also pick This phone · APs only, which lists access points from the phone's own Wi-Fi scan but no clients.
- Band and width coverage depend on the radio, driver and country. ESP32-C5 covers 2.4 and 5 GHz, not 6 GHz. Mudi 7 needs its support package and a wired control connection; see Mudi 7 setup.
How to run a scan and read the list
- Connect the sensor in Devices (how).
- Tap Scan.
- Open the setup:
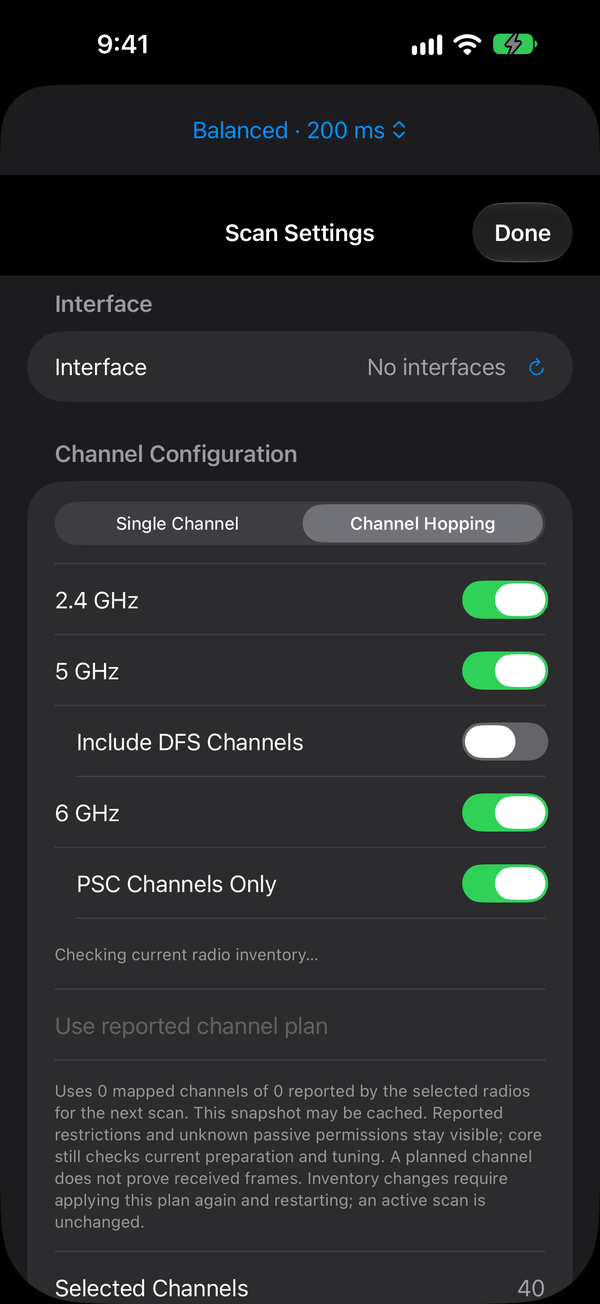
- On iPhone, tap the gear (Channel Settings). The Scan Settings sheet opens.
- On Android, the setup shows on the Scan screen while it is idle. If it is hidden, tap ⋮ (Scan actions) › Show scan setup.
- Choose the radio under Interface. With several radios, each starts on Auto and the device splits the channels between them.
- Choose how to cover channels:
- On iPhone, set Mode to Single Channel or Channel Hopping.
- On Android, turn Channel Hop on or off.
- For hopping, choose bands:
- On iPhone: 2.4 GHz, 5 GHz, Include DFS Channels, 6 GHz, and PSC Channels Only for 6 GHz.
- On Android: the chips 2.4 GHz, 5 GHz, 5 DFS and 6 GHz. The 6 GHz chip sweeps PSC channels only; to add non-PSC channels, pick them under Choose channels.
- Set the dwell time. Use Scan profile: Balanced (200 ms), Fast AP sweep (150 ms), Client observation (500 ms) or Custom (50–5000 ms per channel). The iPhone Scan Settings sheet also has a Dwell Time picker. ESP32-C5 and AirWire dwell is set by the firmware.
- On iPhone, tap Done.
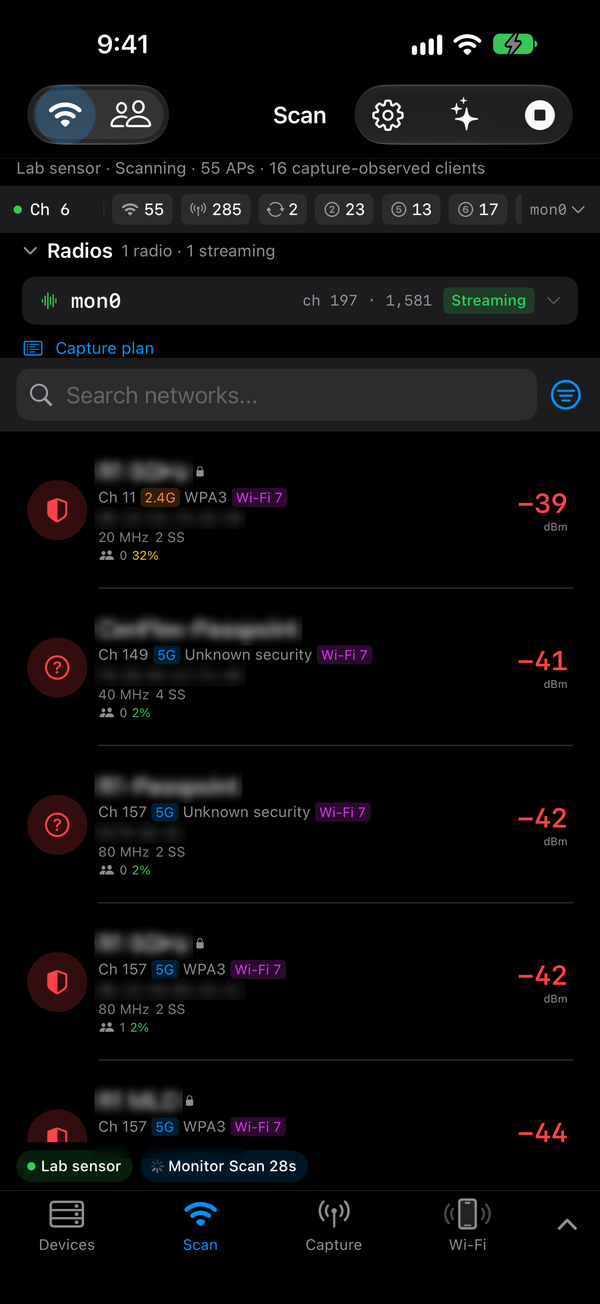
- Tap Start (on Android, the play button). Networks appear as packets arrive; you do not need to wait for a full sweep.
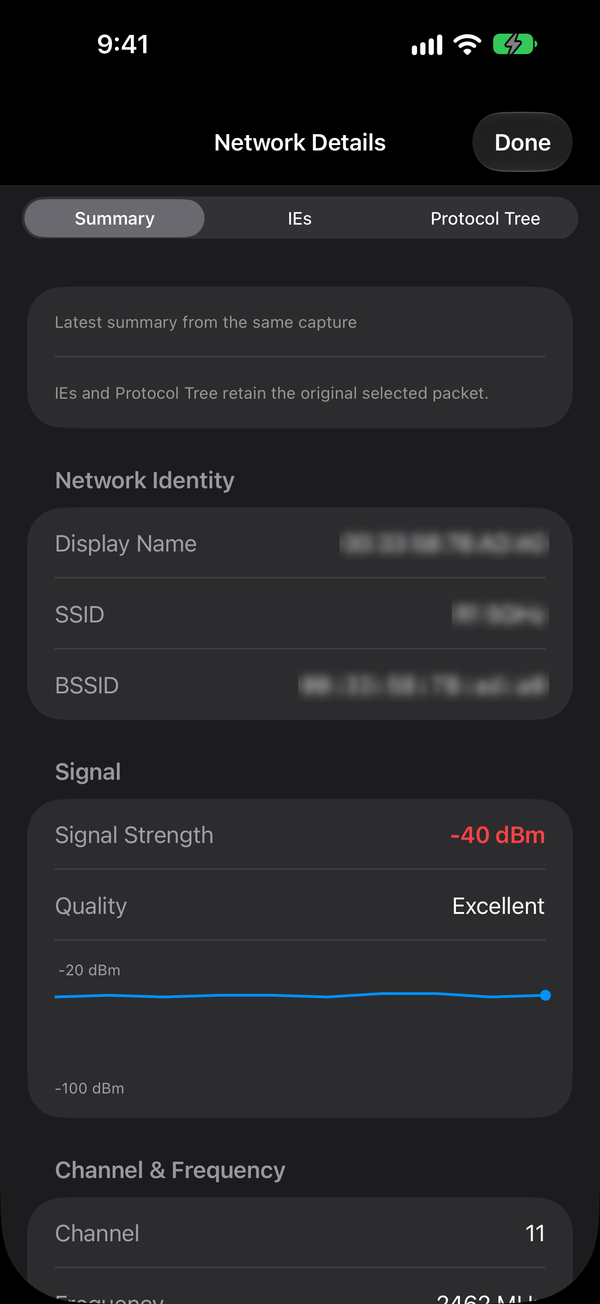
- Tap a network to open Network Details. On iPhone the tabs are Summary, IEs and Protocol Tree. On Android they are Summary, Information Elements, Dissection and Channel, and the screen title is the SSID.
- Tap Stop to end the scan.
How to look at clients and roaming
Clients is a view inside Scan; the same scan collects both.
- Start a scan with a sensor selected.
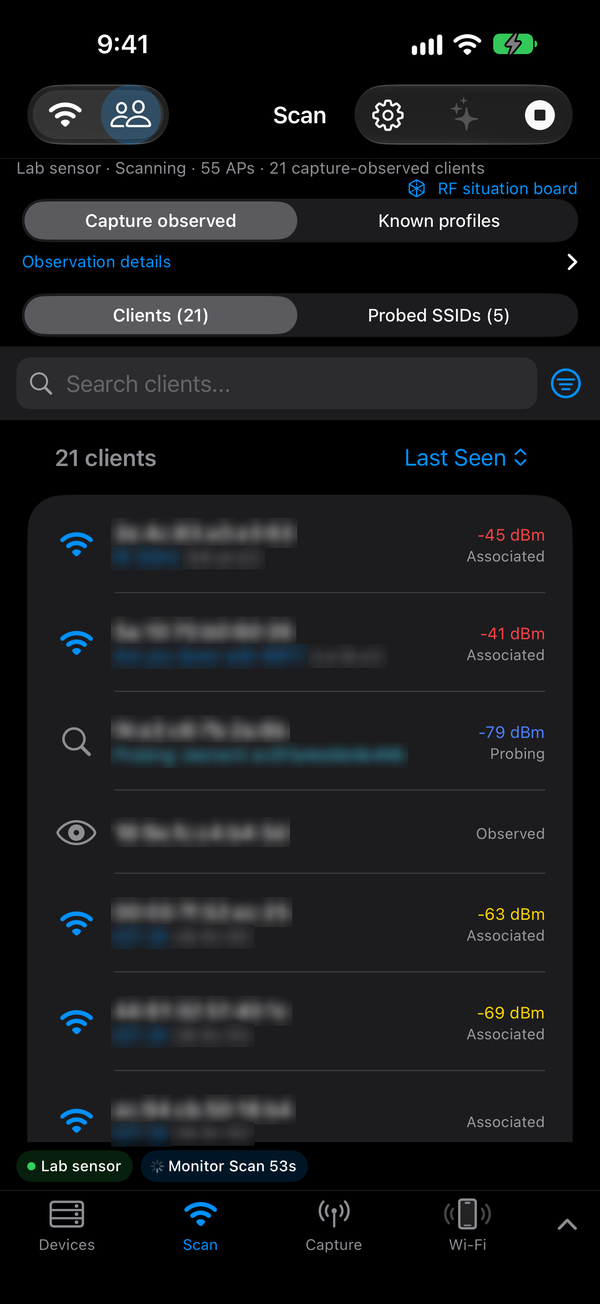
- Tap the people icon (Observed clients) at the top of Scan. Tap the Wi-Fi icon (Access points and SSIDs) to go back.
- Switch between Clients and Probed SSIDs at the top of the list. Clients appear when they transmit.
- Tap a client to open Client Details.
- To see roaming, use the timeline filter Roaming (the other filters are All, Frames and Power Save). Roaming Events gives the count. On Android, a Roaming section lists the moves between access points.
How to get a channel recommendation and a Wi-Fi health Report
The app has two kinds of channel advice. They answer different questions.
Where to listen (capture value). This ranks channels by how much there is to see. It rewards busy channels, so it is not advice on where to put an AP.
- On iPhone, open Scan Settings after a scan and look under Recommended Channels. Tap + to scan that channel (or add it to the scan list when hopping). Tap a row for the breakdown.
- On Android, open a network's Network Details › Channel. It shows Best channels to capture and Channel occupancy.
Where your AP should be (Report). The Report grades the network your phone is joined to, from the sensor's scan data.
- Connect your phone to the Wi-Fi network you want to check, and select the sensor in Devices.
- Run a scan on the bands that network uses (see above). On iPhone you can also tap Start Scan in the Report.
- Expand the tab bar and tap Report.
- Read the sections:
- Your AP — the radios the app grouped as one physical access point. Shown only when your AP has more than one radio.
- Interfering With You — neighbours overlapping your channel, or "Nothing is overlapping your channel."
- Scan Data — how old the newest observation is.
- Health — validation results, including Experience (QoE).
- Channel Recommendation — stay, move or reduce width, with a confidence level.
- Speed (Cloudflare) — tap Run Speed Test for download, upload, latency and jitter against speed.cloudflare.com. This uses your phone's connection, not the sensor.
- Security — WPA3/SAE/OWE and PMF across the scanned networks.
- Pull down (iPhone) or tap Refresh (Android) after a new scan.
The Report has no share or export button. To share findings, take a screenshot, or export the scan as described in files and exports.
Tips
- Start with a known access point. Scan the single channel of an AP you know is active. That checks the whole path: radio, sensor link, app and list. Then widen to the bands the survey needs.
- Dwell trades coverage for depth. A radio hears a channel only while it is tuned there. A long hop list visits each channel briefly, and a client's short burst can fall between visits. Use a single channel to study one AP or client; use hopping to discover the environment. Use Client observation when clients matter.
- DFS: receiving on a DFS channel and transmitting on it are different things. If DFS channels are swept but empty, confirm a known AP on one before blaming the radio.
- Set the real country. The world regulatory domain can remove 6 GHz from adapters that follow it; Intel self-managed cards can differ. Never set another country to get around local rules.
- Treat the list as observations. Signal depends on antenna, orientation, distance and obstructions. Compare two scans only when coverage, dwell, duration and position match. See the held versus free-standing comparison and the antenna shootout.
- Clients are evidence, not an inventory. A client may be quiet, elsewhere, or using a changing private address.
- Mind what you share. SSIDs and BSSIDs in screenshots and CSV files can be looked up to a location.
- Next step: once you know the channel and target, run a focused capture.
If it doesn't work
| What you see | What to do |
|---|---|
| "Connect to a device from the Devices tab to start scanning." | Connect a sensor in Devices, then return to Scan. |
| The list stays empty | Scan one channel with a known AP first. Check the right radio is selected under Interface. |
| No clients, only APs | On Android, check the source is the sensor, not This phone · APs only. Raise the dwell, or stay on the AP's channel. |
| No 6 GHz networks | Check the sensor's country setting and that the radio supports 6 GHz. On Android, non-PSC channels need picking under Choose channels. |
| "Stop scan to edit setup?" | Tap Stop scan and edit setup. |
| Report says "No scan data yet" | Run a scan with the sensor, then refresh the Report. |
| Your AP or Interfering With You is missing | Connect the phone to the network you want graded, and scan the band it uses. |
Related
Capture & analyze · Connecting sensors · Files and exports · Hardware compatibility · ESP32-C5 · Troubleshooting