
Every scan, capture and test starts on the Devices screen. This guide covers the three ways a sensor reaches the app.
What you need
| Sensor | How it connects | Platforms |
|---|---|---|
| NanoPi, Raspberry Pi, WLAN Pi or another Linux host | SSH over your network | iPhone, iPad, Android |
| Freshly flashed unified image | USB Ethernet link at 198.18.42.1, then SSH |
iPhone, iPad, Android |
| ESP32-C5 board | Bluetooth LE | iPhone, iPad, Android |
For other equipment, check the compatibility reference.
How to add a Linux sensor over SSH
- Power the sensor and connect it to the same Wi-Fi or LAN as your phone.
- Open Devices. On iPhone, tap Scan Network to search again; on Android, tap Refresh.
- Wait for the sensor to appear under On This Network.
- Open the found sensor:
- On iPhone, tap its row (or +). The Add Discovered Device form opens with the name, host and port filled in.
- On Android, tap Connect on its row. A sensor that needs a login opens Edit Device so you can enter credentials.
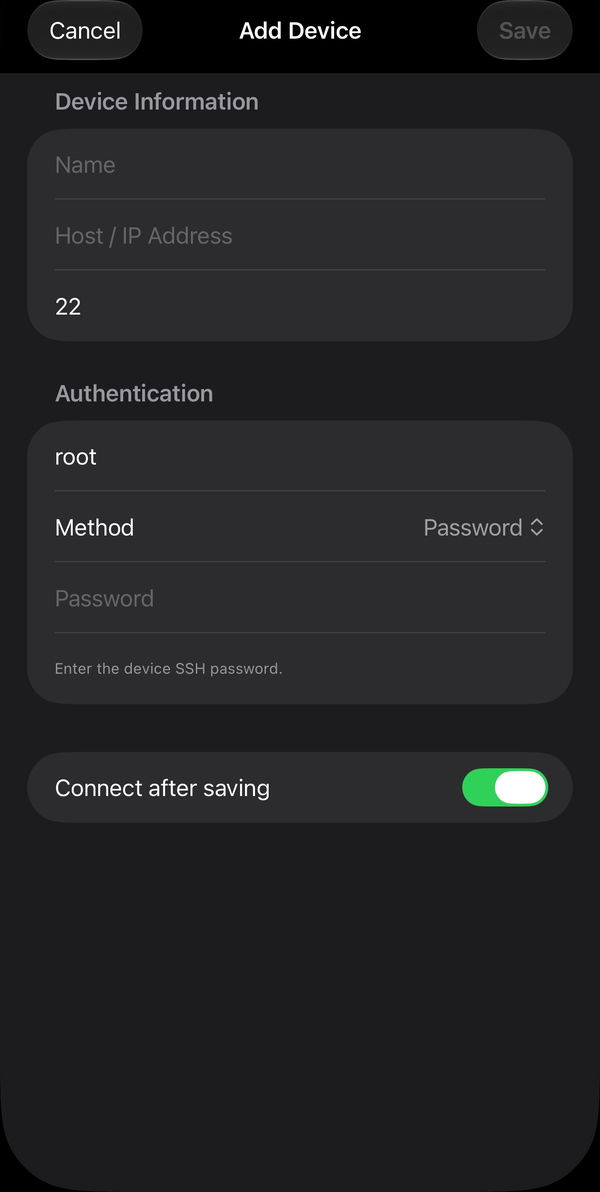
- If the sensor does not appear, add it by address. On iPhone, tap Add Device (the + button), or Add Manually on an empty list. On Android, tap Add device (+). Enter the name, host or IP address, and port (SSH is
22). - Under Authentication, enter the Username. Choose Password or Private Key, then enter the password or key path.
- Save:
- On iPhone, leave Connect after saving on and tap Save.
- On Android, tap Save & test. The app tests the login and shows Connected. when it works.
- Tap the sensor's row to open its device detail. You should see it as connected, with its health and radios. To connect later, tap Connect on the row.
Enter the SSH account set up on that sensor. Older NanoPi and WLAN Pi images documented wlanpi / wlanpi. The app suggests the username wlanpi for those sensors, but you choose the password. Change any default password before you deploy. Do not assume these credentials work on other equipment.
The unified image has no shared default password. Each new sensor has a one-time setup code. Claim the sensor with that code and choose a password before you log in over SSH. To do this from the app, use the USB steps below. Do not try the older images' default password on a unified sensor.
How to set up a new unified sensor over USB
The unified image gives the sensor a USB Ethernet link. The sensor sits at 198.18.42.1 on that link. The app reads the one-time setup code over the cable, so you don't type it.
- Connect the sensor to the phone by USB. On a NanoPi, this is the USB-C port that also powers it. Power and adapters still matter; see parts and wiring.
- Open Devices. The sensor appears as Unidentified USB sensor (or by its own name).
- Open the setup form:
- iPhone: tap the sensor's row. In Add Discovered Device, the WLAN Commander USB setup section reads the code by itself. It should say New device detected on USB. Choose its password to finish setup.
- Android: tap Add device (+) and enter
198.18.42.1as the Host. In the WLAN Commander USB setup card, tap Read USB setup code. It should say Setup code read from USB. Choose a new password above.
- Enter a new Password. iPhone accepts 8 characters or more and recommends 12. Android requires 12 or more. This password also protects SSH and the sensor's website.
- Tap Set up device over USB. When it finishes, you see Setup complete. Save and connect to this device.
- Tap Save (iPhone) or Save & test (Android). The username is
wlanpi.
You only claim a sensor once. If the sensor is already claimed, add it with the password you chose. Without a USB link, claim the sensor from its own website with the code from its SD card; see the unified image guide.
How to pair an ESP32-C5 over Bluetooth LE
- Flash the board with the firmware installer. Unplug it from the computer and power it again. The USB serial link is only for flashing. The phone talks to the board over Bluetooth.
- Allow Bluetooth on iPhone, or Nearby devices on Android, when the app asks.
- Open Devices. The board appears under On This Network. Its name depends on its firmware build.
- Connect it. It needs no password:
- On iPhone, tap the board's row.
- On Android, tap Connect on its row.
The app connects and opens the board's networks. 5. To read the board's firmware name, version and build ID, open its device detail. Look under Firmware (iPhone).
A board serves one phone at a time. If it is connected to another phone or computer, disconnect it there first. When you build a kit with several boards, power and label them one at a time. Then check that every board you plan to use is selected.
How to check the radio before you start
A connection does not prove the sensor has the radio you need. In device detail, check the adapter, band, channel list and firmware. On iPhone, Radio status › Country, driver and channels lists which 5 GHz and 6 GHz channels are enabled. An ESP32-C5 cannot become a 6 GHz radio through any setting.
If a radio is missing on Linux, check that the adapter is detected and its driver and firmware loaded. If the radio is there but a band is not, check the country setting.
Tips
- On iPhone, the phone and the sensor must be on the same Wi-Fi or LAN. Allow Local Network access when iOS asks. If you denied it, go to Settings › WLAN Commander › Local Network.
- Discovery uses mDNS, which often does not cross subnets or VLANs. Add the sensor by IP address in that case.
- Saved sensors are recognised by their identity, so a new address does not create a duplicate.
If it doesn't work
| What you see | What to do |
|---|---|
| Nothing under On This Network | Check that you are on the same network and that Local Network access is on (iPhone). Then add the sensor by IP address. |
| Sensor listed but the connection fails | Check routing, client isolation and VLAN rules, the SSH service, your credentials, and that the sensor has finished booting. |
| Connect the sensor directly by USB to read its setup code. | The phone has no USB link in 198.18.42.x. Check the cable, adapter and power, then reopen the form. |
| An ESP32-C5 never appears | Power the board. Disconnect it from any other phone or computer. On Android, tap Refresh, which restarts the Bluetooth scan. |
| The connection drops during work | Restore power and the network, then reconnect in Devices. An ESP32-C5 stops when the link drops. Do not assume a capture kept running; check the file's duration and timing. |
Related
Unified sensor image · ESP32-C5 · Compatibility · Troubleshooting